

Kickstarter Prep Checklist for Hardware Founders

Use this Kickstarter checklist for hardware founders to validate engineering, build demand, and launch a winning campaign.
What to Check Before Your Hardware Kickstarter Goes Live
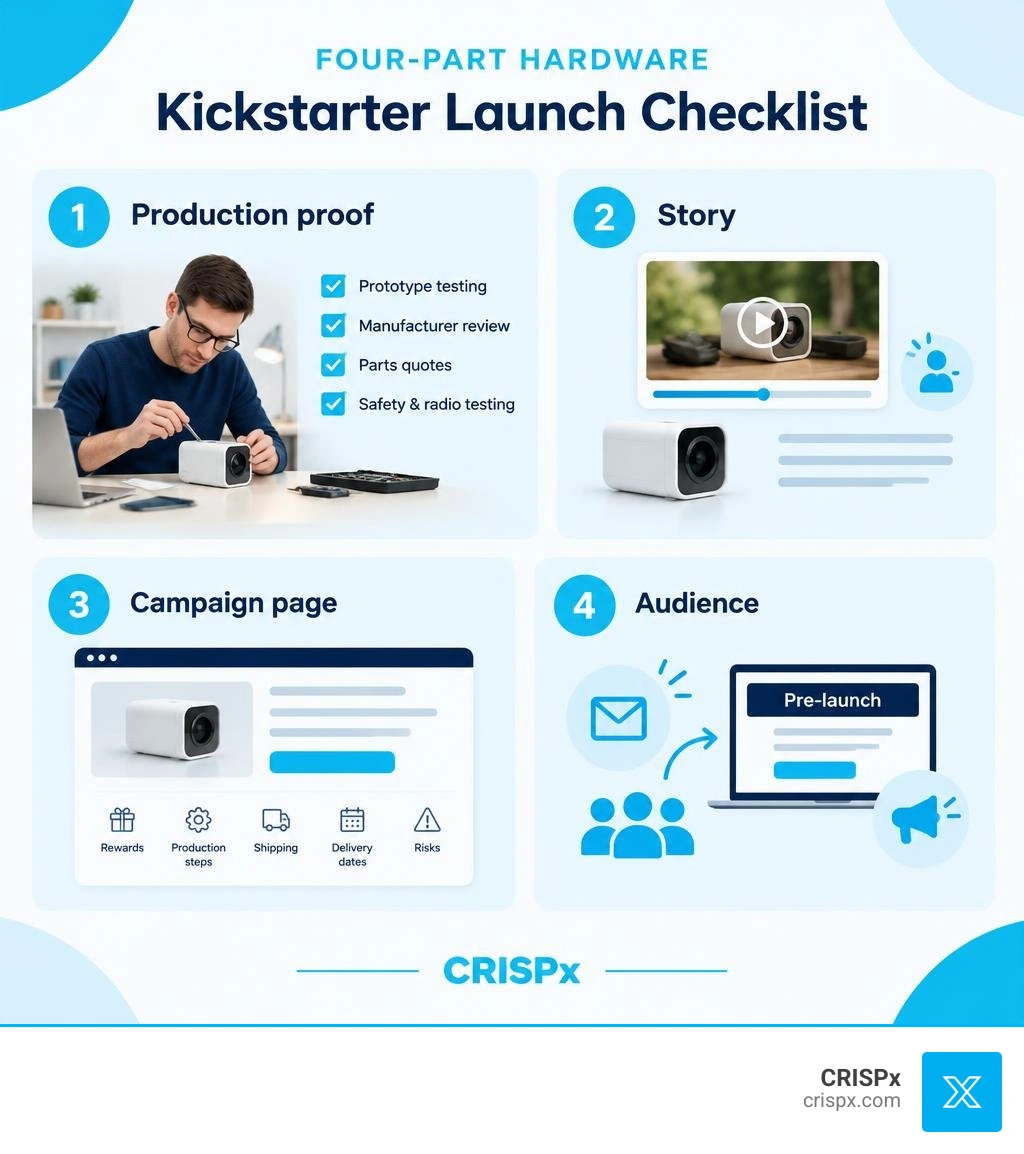
Before you launch, prove you can build and deliver the product, then make it easy for backers to understand and trust it. Use this hardware Kickstarter checklist:
- Check production readiness: Test a working prototype, review the design with a manufacturer, get parts quotes, and plan required safety and radio testing.
- Tell a clear story: Say what the product does for the buyer before listing specs. Show it working in a real demo.
- Build the campaign page: Explain rewards, production steps, shipping, delivery dates, and risks without hiding the hard parts.
- Build demand before launch: Collect emails, set up a Kickstarter pre-launch page, and plan messages for your waitlist.
- Prepare launch outreach: Have a press kit, reviewer samples, community contacts, and a launch-day plan ready.
Crowdfunding can show whether people want your product. It should not be the first time you find out whether the product can be made.
1. Why Hardware Crowdfunding Fails: The Engineering Pre-Check
When hardware campaigns fail to deliver, the cause is often engineering and manufacturing, not bad intent. A prototype that works on the bench is not the same as a product a factory can build again and again.
Common failure points include parts that are hard to manufacture, subsystems that break when combined, production scale-up delays, and certification problems found too late.
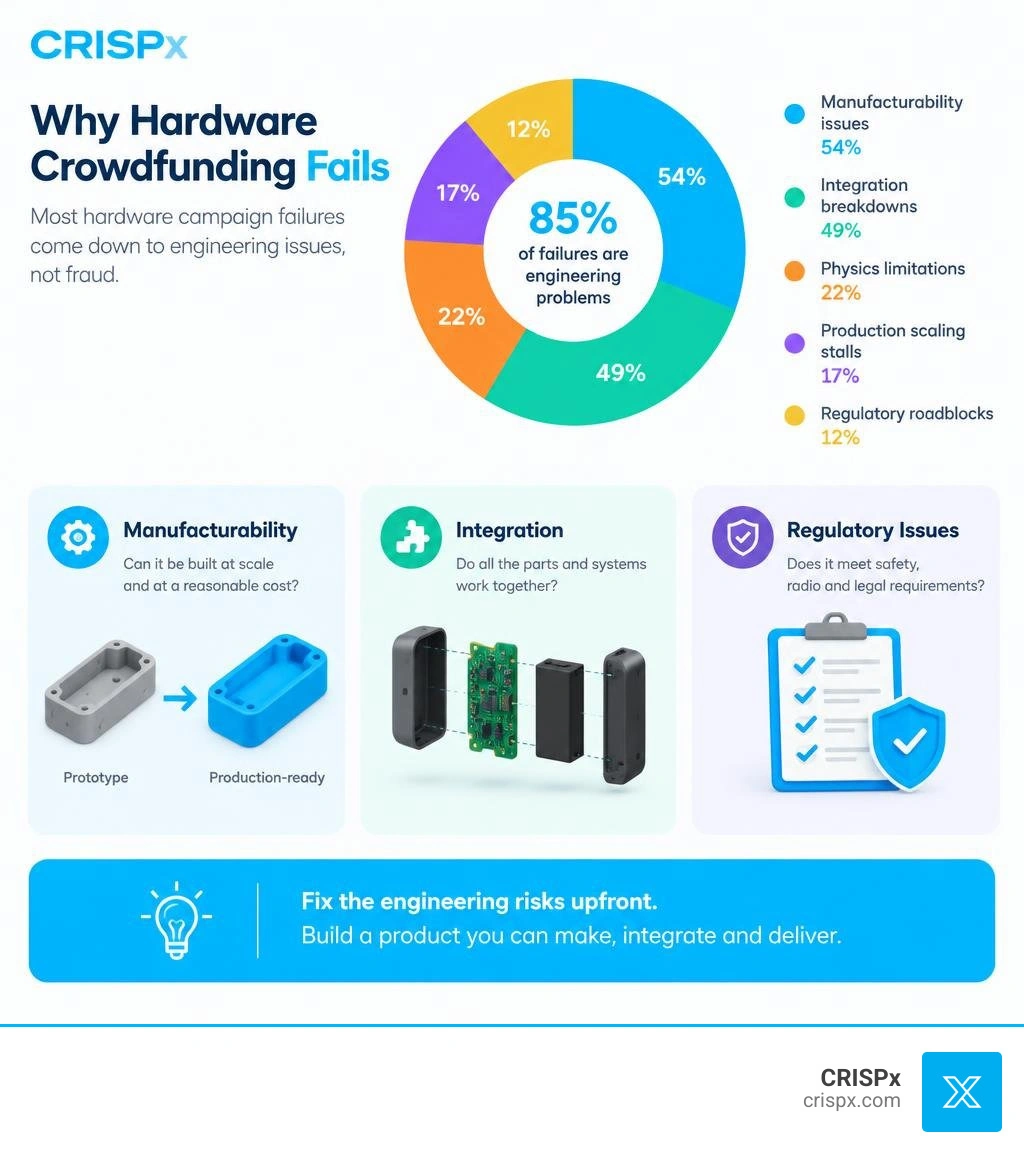
Founders often design a functional prototype using 3D printing and off-the-shelf boards. However, designing a single benchtop model is completely different from setting up a repeatable assembly line. Skipping a formal Design for Manufacturing (DFM) review is a common way for tooling costs and production timelines to run over plan.
Before you finalize your funding target, conduct a thorough engineering pre-check:
- DFM and Mold Review: Verify wall thicknesses, draft angles, parting lines, and material shrinkage rates on all custom enclosures.
- Volume Bill of Materials (BOM): Obtain firm component pricing for realistic production volumes (1,000 to 5,000 units), not unit prices from hobbyist component catalogs.
- System Integration and Environmental Stress: Run high-risk subsystem tests together under real load. Validate thermal dissipation and power management before freezing your design.
- Supply Chain Redundancy: Identify pin-compatible alternates for microcontrollers, power management ICs, and passive components.
| Milestone Factor | Prototype Stage (Lab Unit) | Production Stage (Factory Line) |
|---|---|---|
| Enclosure | 3D-printed SLA/FDM resin | Injection-molded ABS/PC with tooling draft angles |
| Electronics (PCB) | Hand-soldered breakout boards | Automated SMT assembly with panelized fiducials |
| Component Sourcing | High-mix retail component vendors | Direct factory supply with verified volume BOM |
| Firmware Loading | USB debugging via IDE | Automated flash programmer during end-of-line test |
| Testing | Manual benchtop oscilloscope validation | Multi-station quality control and yield tracking |
2. Phase 1: Story, Positioning, and Technical Messaging
Messaging Hierarchy: Value Proposition Before Technical Specs
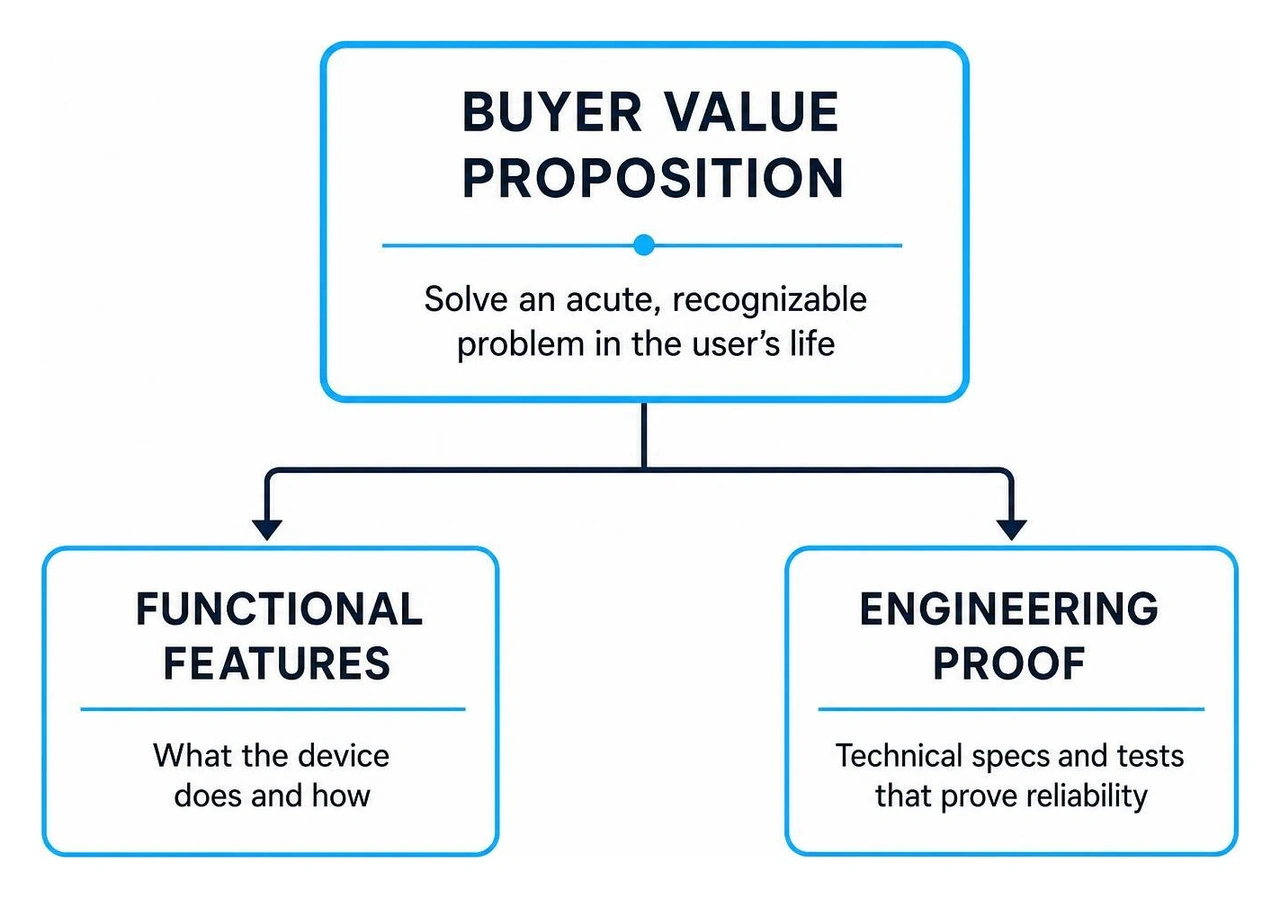
Engineer founders often build incredible devices, but their campaign pages end up reading like technical datasheets. Backers back products that solve an acute, recognizable problem in their lives. If your first paragraph describes your dual-core ARM processor instead of the problem it solves, potential backers will bounce.
Lead with an undeniable customer benefit, then back up that promise with your engineering specs. Using a structured technical messaging framework ensures you clearly answer three core questions within seconds of a visitor landing on your page:
- What does this device do for me?
- Why is this fundamentally better than existing market alternatives?
- How does the underlying technology prove it will work reliably?
Position the user as the hero, your hardware as the tool, and the technical specifications as the proof points.
Video and Visual Proof: Real Prototypes vs Renders
Your campaign video is your single most effective conversion asset. Keep your main video under 90 seconds and structure it tightly:
- 0:00–0:15: Hook the viewer with the core problem.
- 0:15–0:45: Show your functional prototype solving that problem in a real environment.
- 0:45–1:15: Introduce the founding team and share your manufacturing roadmap.
- 1:15–1:30: Give a clear call to action to back the project.
Official Kickstarter hardware and product design guidelines prohibit product simulations and photorealistic renderings that could be mistaken for finished products. You must demonstrate an actual working prototype on camera. Real-world photography, unedited video clips of core features, and benchtop testing footage build trust and satisfy platform compliance.

3. Phase 2: Building Your Pre-Launch Waitlist and Audience Demand
Kickstarter Checklist for Hardware: Pre-Launch Page and Email Capture
A successful launch happens before the campaign page goes live. If you launch to an empty room, there is no one to back you on day one. Build a dedicated pre-launch landing page and publish your Kickstarter pre-launch page well before your go-live date, so you have time to collect sign-ups.
Use proven hardware demand generation tactics to drive targeted traffic to your email capture page:
- Single-Sentence Hook: State your core value proposition clearly above the fold.
- Authentic Imagery: Showcase your functional prototype in action.
- Incentivized Sign-Up: Offer early-bird discount notifications or exclusive day-one backer perks.
- Email List Size Target: Work backward from your funding goal: estimate how many of your subscribers are likely to back on day one, and grow the list until that number covers a strong start.
Audience Nurturing and Day-One Momentum
Collecting email addresses is only the first step; you also have to keep those subscribers engaged. Send bi-weekly development updates detailing real engineering wins, component selection choices, and behind-the-scenes factory visits. When subscribers feel like part of the building process, their intent to buy increases.
A strong first 48 hours matters. Early momentum gives the campaign social proof and gives new visitors a reason to back it. Line up your waitlist, community and press so the first pledges arrive quickly.
4. Phase 3: The Kickstarter Checklist for Hardware Campaign Page
Page Structure, Comparison Tables, and Trust Signals
A high-converting campaign page guides the backer's eye logically from emotional interest to technical confidence. When executing a high-tech product launch, organize your page into clean, visual sections:
- Hero Section: High-resolution photo of the physical product, primary tagline, and major press quotes.
- Demonstration in Use: Animated GIFs and short video clips of core product functions.
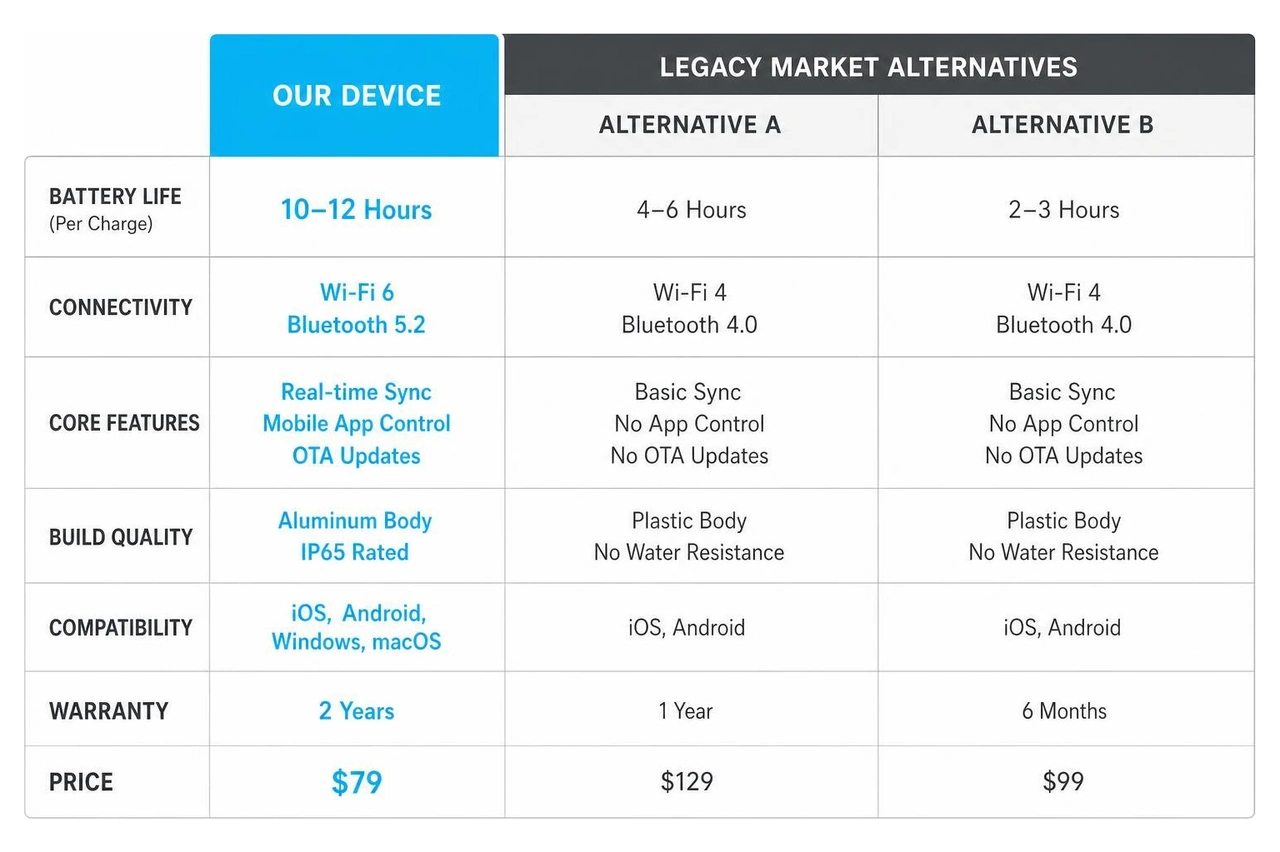
- Feature Comparison Table: A clean grid directly comparing your device's features, battery life, connectivity, and price against legacy market options.
- Engineering and Production Proof: PCB layout views, thermal dissipation logs, and tool fabrication milestones placed above the Risks and Challenges section.
- Team Credibility and Factory Partners: Founder background, past hardware shipments, and verified manufacturing partners.
- Detailed FAQ: Direct answers addressing compatibility, battery replacement, data security, and regional electrical standards.
Make sure all layout tables and typography scale cleanly on phones, since many backers will view the page on mobile.
Pricing Structure, Reward Tiers, and Honest Shipping
Complex reward structures confuse buyers and hurt conversion rates. Limit your campaign to 4 to 6 clear reward tiers:
- Super Early Bird (Limited Quantity): The deepest discount, limited in number, to reward day-one backers.
- Early Bird: A smaller discount once the first tier sells out.
- Standard Kickstarter Backer: A modest discount below planned retail.
- Multi-Pack or Bundled Accessory Tier: Dual units or add-on cables. Consider a low-cost entry tier (such as a branded accessory) so supporters who are not ready to buy the device can still back you.
Do not underprice your product to win early pledges. Your baseline funding target must cover complete tooling costs, non-recurring engineering (NRE) charges, scrap rates, certifications, platform fees (Kickstarter lists a 5% fee plus 3% to 5% payment processing in the US), and a contingency reserve. As detailed in the IoT hardware roadmap from prototype to production, international freight rates, import duties, and local taxes can quickly wipe out margins if you do not calculate landed costs upfront. Charge shipping post-campaign via pledge managers to protect yourself against global freight rate spikes.
5. Phase 4: Press, Creator Reviews, and Launch-Day Activation
Hardware Review Units and Media Outreach Timing
Securing media coverage requires long lead times. Top tech journalists and hardware reviewers rarely cover concepts backed only by digital illustrations. They want to test real hardware.
As part of your product launch marketing plan, have working pre-production review units ready well before launch:
- Build a Digital Press Kit: Include high-resolution lifestyle photography, clean product cutouts, founder bios, a fact sheet, and b-roll video footage.
- Target Specialized Tech Outlets: Pitch specific writers who actively cover your hardware niche (e.g., consumer robotics, maker tools, smart home devices).
- Coordinate Embargo Dates: Set review embargos to lift on your exact launch morning to generate an initial surge of search traffic and social validation.

Kickstarter Checklist for Hardware: Launch-Day Execution Plan
Launch day requires focus, speed, and real-time community management. Execute your launch day using a disciplined sequence:
- T-0 Hour: Send your primary email announcement to your VIP waitlist.
- T+2 Hours: Broadcast your campaign link across all brand channels, social feeds, and developer forums.
- T+4 Hours: Send personal outreach to early testers, partner networks, and industry contacts requesting day-one backing.
- Active Community Management: Answer all backer comments and direct messages within 60 minutes. Early backer trust sets the tone for the entire campaign.
When managing ongoing campaign momentum, many technical teams partner with a dedicated Kickstarter marketing agency to run backer retargeting ads, manage lookalike audiences, and handle backer communications throughout the mid-campaign slump.
6. The Complete Printable Pre-Launch Hardware Checklist
Use this structured summary checklist to ensure your project is ready for backers:
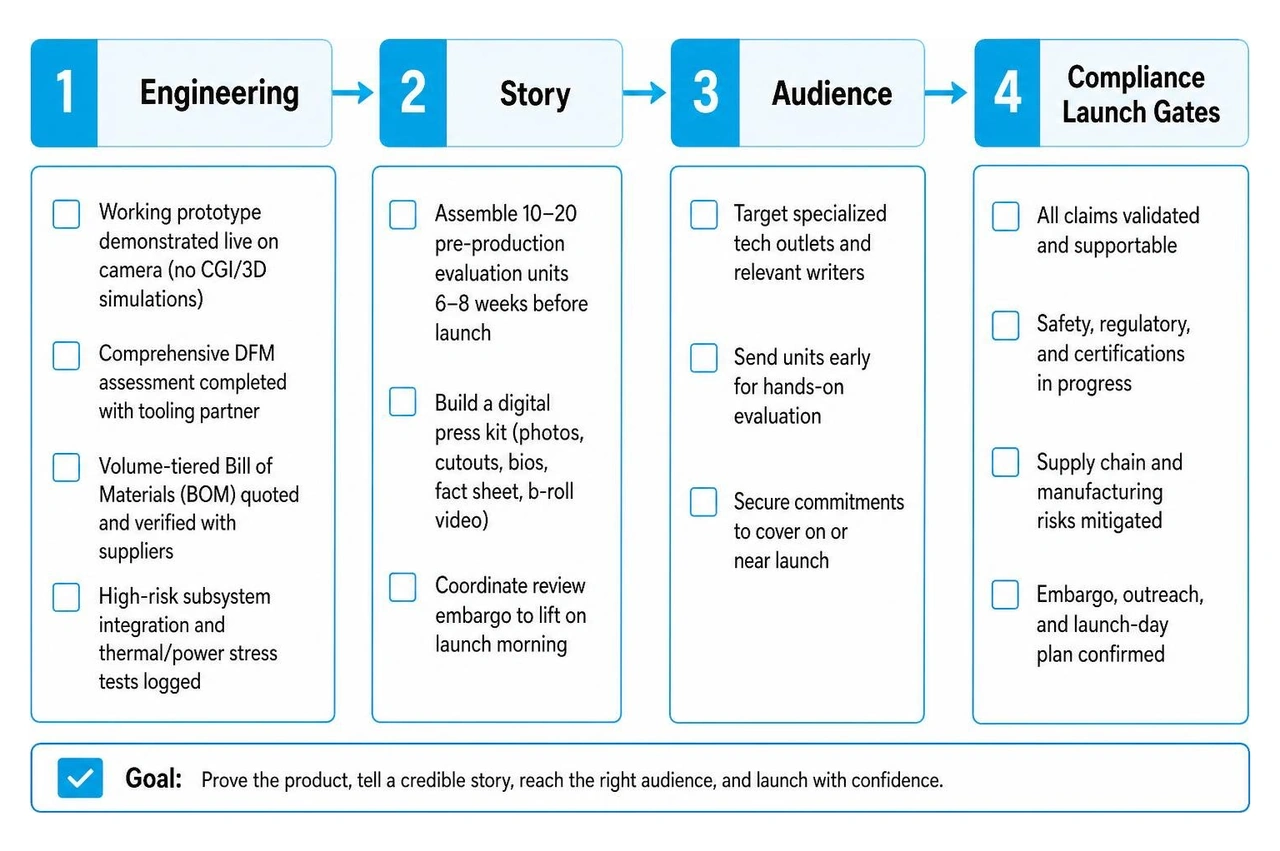
Gate 1: Engineering & Manufacturing Readiness
- [ ] Working prototype demonstrated live on camera (no CGI/3D simulations)
- [ ] Comprehensive DFM assessment completed with tooling partner
- [ ] Volume-tiered Bill of Materials (BOM) quoted and verified with suppliers
- [ ] High-risk subsystem integration and thermal/power stress tests logged
- [ ] Primary manufacturing partner selected with established service agreements
- [ ] Component supply chain mapped with secondary alternatives for single-source ICs
Gate 2: Certifications & Regulatory Planning
- [ ] RF and wireless compliance roadmap mapped (FCC Part 15, CE RED, UKCA)
- [ ] Safety and high-voltage testing pre-evaluations scheduled (UL, IEC, ETL)
- [ ] Battery transportation and safety certifications budgeted (UN 38.3, IEC 62133)
- [ ] Environmental standards reviewed (RoHS, REACH, WEEE compliance)
Gate 3: Story, Page & Content Assets
- [ ] Clear one-sentence value proposition explaining buyer benefit before specs
- [ ] Campaign video produced under 90 seconds showing actual working device
- [ ] High-resolution photography of real prototype parts (no mock renders)
- [ ] Competitor comparison table detailing advantages and unique specs
- [ ] Risks & Challenges section completed with honest timelines and buffers
- [ ] Detailed FAQ covering compatibility, technical limits, and regional specs
Gate 4: Financial & Reward Architecture
- [ ] Funding goal calculated using bottom-up production, tooling, and NRE costs
- [ ] Contingency budget built into overall funding target
- [ ] A small number of clear reward tiers, including a low-cost entry tier
- [ ] Landed shipping costs, import duties, and regional VAT plans accounted for
- [ ] Post-campaign pledge manager selected for final address and tax collection
Gate 5: Pre-Launch Marketing & Launch Day Activation
- [ ] Pre-launch landing page and Kickstarter pre-launch page live well before launch
- [ ] Email waitlist grown to the target you set from your funding goal
- [ ] Bi-weekly email nurturing sequence executed to maintain high list engagement
- [ ] Digital press kit prepared with images, specs, founder story, and b-roll
- [ ] Working review units shipped to selected journalists under embargo
- [ ] Launch-day communication schedule and team monitoring shifts assigned
Frequently Asked Questions About Hardware Crowdfunding
When should hardware founders start pre-launch marketing before launching on Kickstarter?
Start pre-launch marketing well before your launch date. You need time to build a landing page, test your messaging, grow an email waitlist, and get working review units to journalists ahead of launch-day embargoes. Plan backward from your launch date so each of these is ready in time.
What regulatory certifications must be planned before a hardware campaign goes live?
Any physical product that plugs into a wall, emits radio frequencies, or contains rechargeable lithium batteries requires formal testing before entering key global markets:
- FCC Certification (USA): Unintentional radiators require FCC Part 15B verification, while wireless devices (Bluetooth, Wi-Fi, LoRa) require FCC intentional radiator testing.
- CE Mark & UKCA (Europe & UK): Covers Electromagnetic Compatibility (EMC), Radio Equipment Directive (RED), Low Voltage Directive (LVD), and RoHS environmental testing.
- Safety Testing (UL / ETL / IEC): Essential for AC power supplies, smart home hardware, and power electronics.
- Battery Safety (UN 38.3): Mandatory testing for any device containing lithium-ion/polymer cells before air shipping.
Get quotes and timelines from accredited test labs early, and build both into your budget and production schedule.
How can a campaign earn the Kickstarter 'Projects We Love' badge?
The "Projects We Love" badge is chosen by Kickstarter staff. Signals that help a campaign earn trust with editors and backers include:
- An original design that genuinely solves a real problem.
- A concise founder-to-camera video under 90 seconds.
- High-quality, authentic photography of physical prototypes with zero CGI or 3D renders.
- Clear, honest messaging free of hype words like "revolutionary" or "world's first."
- Strong early funding momentum.
- A fully completed creator profile showing past project history and transparent manufacturing plans.
Conclusion: Turn Hardware Innovation into Market Demand
Bringing a new hardware product to market is one of the hardest challenges in business. By pairing solid engineering with a clear, benefit-driven story and a qualified pre-launch waitlist, you protect your company from common manufacturing pitfalls and build lasting credibility with early backers.
At CRISPx, we plug in as your complete marketing and sales team so you do not need to hire an internal head of marketing. We work side by side with technical founders across consumer electronics, robotics, computing, and defense. Tony Crisp has 30 years in branding, 100+ hardware launches and 8+ patents. Robosen Optimus Prime went from Kickstarter to CES, then Hasbro and Disney licenses; FuzeDrive ran a top 1% Indiegogo campaign; and SecureCircle was acquired by CrowdStrike.
We run our strategic marketing through The DOSE Method™:
- Diagnosis: Find what's broken in your current positioning, audience funnel, or technical story.
- Prescription: Fix the biggest problem first to ensure maximum conversion.
- Prognosis: Set clear benchmarks, track backer metrics, and adjust campaigns in real time.
We align these phases with core customer buying triggers:
- Dopamine: They want the product.
- Oxytocin: They trust your team and delivery plan.
- Serotonin: They are proud to back your vision.
- Endorphins: They feel relief that a hard problem is finally solved.
Whether you are preparing for day one or scaling ongoing sales, we offer four straightforward plans tailored to your growth stage: Launch, Grow, Grow + Ads, and Scale.
Ready to see how your hardware product story and campaign positioning measure up? Get a free DOSEscore™ brand checkup of your website and story, or book a strategy call with our launch team today.
Get a free brand checkup.
We work like a brand doctor. The DOSE Method™ finds what's broken, fixes the biggest problem first, then tracks the results.
